folding bikes for going and being human®
Thanks for purchasing a folding bike by Citizen Bike. Review these instructions completely to get your bike set up for your first ride.
Please note that the directions left, right, front and rear are used here as seen by a rider while seated on the bicycle.
It is always advisable to have your bicycle properly assembled by a bicycle professional. This setup and ongoing maintenance will ensure a proper and safe setup and long life for your new folding bike.
Please remove your Citizen Bike folding bike from the delivery package.
Carefully remove all other packing material from the bicycle. This includes all zip ties, axle caps and material protecting the frame. You can cut the zip ties with scissors, a knife, or with wire cutters, but please use caution not to cut or damage any of the bicycle components or cables.
 Your bike may also be shipped with a disposable shipping protector attached to the bicycle frame rest. This is used only for shipping and should be removed before riding and may be discarded.
Depending on the level of pre-assembly, your Citizen Bike may include some loose components. Some loosely packed components may include your plastic bolt caps (for wheel hub bolts), folding bike pedals, bell, tightening tools (if required), reflectors, touch-up paint (some models), and Velcro binding straps. Also packed in your bike carton, you will find your seatpost and saddle. Your seatpost will have your saddle already connected and secured to the seatpost.
Many of these items may be pre-installed or attached to your bike. However, if any item requires installation, the following will guide you through the required setup. For instance, your model may have one or both pedals already attached to your folding bike, as well as the reflectors, bell and bolt caps. Different models arrive with different levels of shipping assembly.
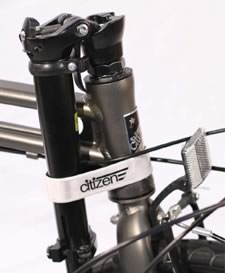 using the Velcro binding straps
One or more Velcro binding straps may be attached to the bicycle. These straps are designed to secure your bike in the folded position.
A strap can be used to secure the folded handlebars to the bicycle frame.
If your bicycle does not have a mechanical locking mechanism, a strap can also be used to bind the two halves of the bike when folded.
 Insert the seatpost into the bike frame.
Close the quick release to lock the seatpost in position. The quick release should close with sufficient force to securely lock the seatpost into position.
To tighten the quick release mechanism, open the quick release, hold the nut opposite the lever with one hand and rotate the quick release lever clockwise a complete rotation while holding the nut firmly. This will tighten the entire quick release mechanism. Now close the quick release lever. You will notice that the quick release lever is more difficult to tighten.
If the quick release requires more tightening, unlock the quick release and continue to rotate the quick release lever while holding the bolt opposite the lever until the quick release mechanism is appropriately tightened. Repeat if necessary.
Please note, your seatpost has imprinted minimum insertion or maximum extension markings. Do not adjust your seatpost beyond this marking.
Your new Citizen Bike may arrive with the handlebar extension detached from the handlebar stem.
Remove the handlebar extension from the center of the folded bike frame. Make sure the brake and shifter cables are not twisted or tangled around your frame before repositioning the handlebar extension.
Open the handlebar height adjustment lever quick release before inserting the handlebar extension.
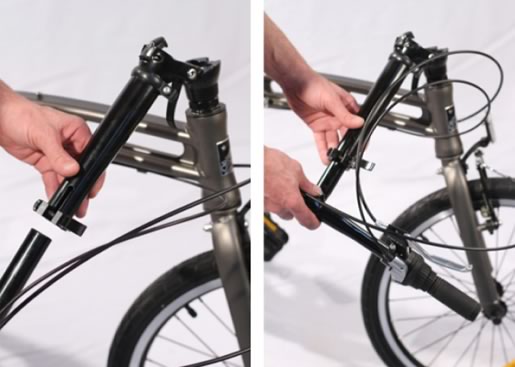
With the handlebars in the folded position insert the handlebar extension into the handlebar stem.
Close and tighten the quick release mechanism to lock the handlebars into the stem.
Please note, your handlebar extension has an imprinted minimum insertion or maximum extension marking. Do not adjust your handlebar extension beyond this marking.
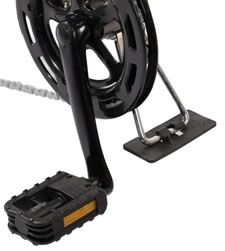
Your Citizen Bike includes a set of folding pedals. Your bike should have one or both pedals pre-installed, depending on your model.
The pedals are marked on the end of the pedal axle: “R” for “Right” and “L” for “Left.” Look for the letter “L” or “R” on the side or end of each pedal spindle.
When seated on the bike, your right foot would correspond to the right pedal and your left foot would correspond to the left pedal.
If your pedals are not pre-installed, first apply a small amount of grease to the threads of each pedal.
Bicycle pedals always tighten in the direction of the front wheel.
Turning the spindle clockwise by hand, thread the pedal marked “R” into the crank arm on the right (drive) side of the bicycle. Make sure that you are not “cross-threading”, which can strip the threads in the crank arm. If the threads do not turn easily, don’t force them. Back the spindle out and start over. Once the pedal is threaded into the crank, tighten the spindle securely to the crank arm with a 15mm open end or an adjustable wrench.
Your Citizen Bike has front and rear hand brake levers. These levers may require angle adjustment and tightening for comfort and safety.
When your handlebars are properly set up, adjust the angle of the handbrake so that they are easily accessible when your hands are on the handlebars.
The angle of the handbrake levers is generally a straight line from your shoulders through your hands to the brakes. Tighten the position of the handbrake levers in this position by tightening the hex nut with a 5mm hex key or Allen wrench.
Your Citizen Bike folding bike comes with a free bell. It is recommended to attach the bell to the left side of the handlebars. Loosen the screw on the attachment ring completely with a screwdriver. Place the attachment ring around the handlebars and replace and tighten the screw. The bell is rung by flicking the small tab. Ding!
For models with a raised handlebar, you can rotate the handlebar to a comfortable position. Use a 6mm hex key to loosen the stem bolt. Rotate the handlebar to the desired angle. Retighten the stem bolt.
Check to insure that the stem bolt and handlebar clamp are completely secure by placing the front wheel of the bicycle between your legs and attempt to twist the handlebar/stem assembly. If you can twist the stem in relation to the front wheel or turn the handlebars in relation to the stem, tighten the appropriate bolts.
Do not fail to install the reflectors on your bicycle. They are an integral part of the bicycle’s safety system.
If not pre-installed, securely fasten the front white reflector to the bracket using the mounting screw. Securely fasten the reflector bracket to the handlebar. If not pre-installed to your seatpost, attach the rear reflector to the seatpost. If your bike has fenders, your rear reflector may be integrated into your rear fender. For bracket reflectors, adjust each reflector’s angle so that it is at 90 degrees to the ground.
If not already attached, attach the two amber wheel reflectors to a pair of adjoining spokes of each wheel in a position opposite the tire valve stem and as close to the wheel rim as the mounting clips allow.


